
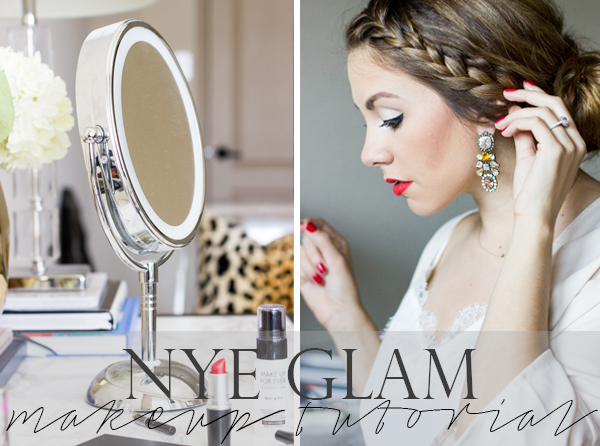
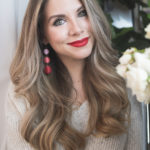
Now that NYE is a couple of days away, I wanted to share a fun makeup tutorial for a night on the town. My daily routine is usually pretty simple. But since the holidays are here, I like to make for a more dramatic look. Here is a fun and simple way I like to glam up my holiday look!
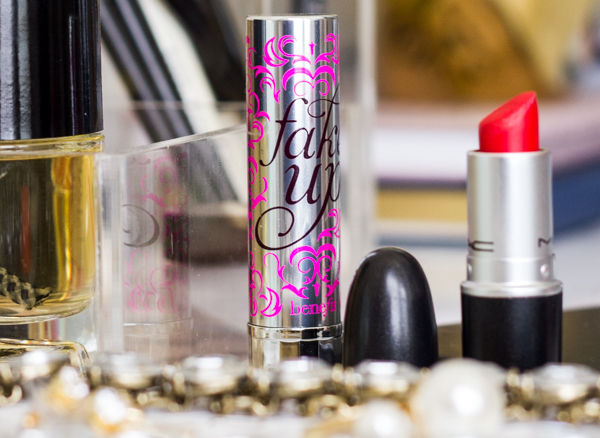
I used the following products:
MAC Studio Fix Liquid Foundation in NC25 // Bobbi Brown Foundation Brush // Benefit Fake Up Concealer in Light // MAC Eyeshadow in Nylon // MAC Blush in Tenderling // Lorac Behind The Scenes Eyeshadow Primer // MAC Lipstick in Dangerous // Stila Liquid Eyeliner // Lancome Hypnose Mascara // Makeup Forever Mist & Fix // Anastasia Contour Kit & Brow Duo (color Taupe)
Cheers! xx
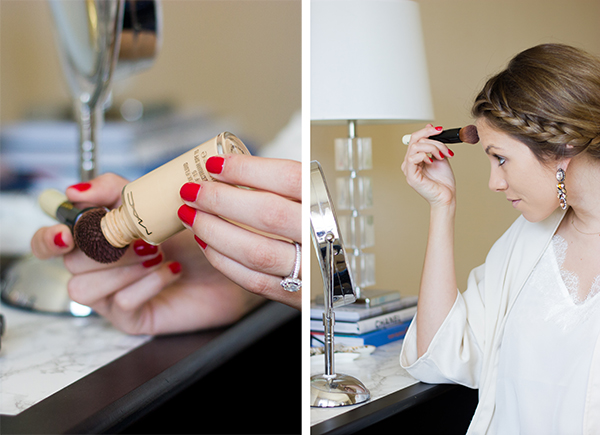
Step 1
After applying your favorite moisturizer, find a long lasting foundation to even out your skin tone. I usually wear Bobbi Brown Liquid Foundation, but for special occasions I like to wear MAC Studio Fix Liquid Makeup (color NC 25). This has some serious lasting power and gives a heavier coverage than my usual Bobbi Brown. I apply the foundation with the Bobbi Brown Foundation Brush. It’s honestly the best brush I’ve ever used! I only use a tad. You can add more if you want heavier coverage. I also lightly brush the leftover foundation over my lips. It helps my lipstick stay on longer. Or, it could make a great nude colored look with just a little gloss.
Step 2
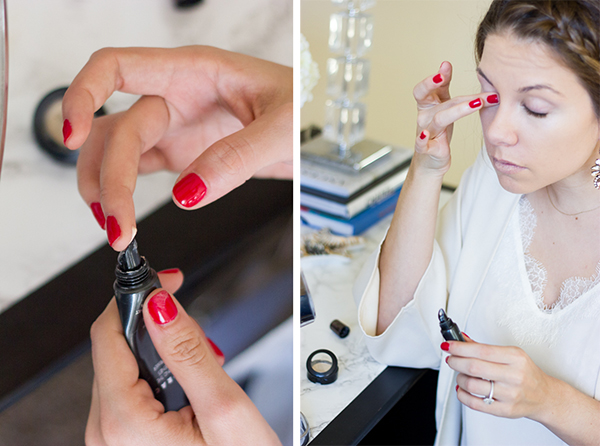
Thanks to my sweet S-I-L, I have found my new favorite under-eye concealer. This Benefit Fake Up Under Eye Treatment has been amazing. I’ve used YSL and Cle De Peau in the past, but this stuff trumps the others. It’s also cheaper and will last all day. I gently rub the concealer under my eye and softly smooth with my finger. You could use a brush to do this too, but I find it easier to use my fingers. Under-eye concealer can also alternatively be applied at the very end of your makeup routine. I usually do that. But since I am using the contour kit, I opted to apply this right after my foundation.
Step 3
Apply a (very) small amount of the Lorac Eyeshadow Primer and gently rub on to both eyelids. This is the best product to beat those eyeshadow crease marks. My wedding makeup artist told me about this bad boy and it has been my go-to ever since. I have tried many other primers but nothing compares—a must have in my book!
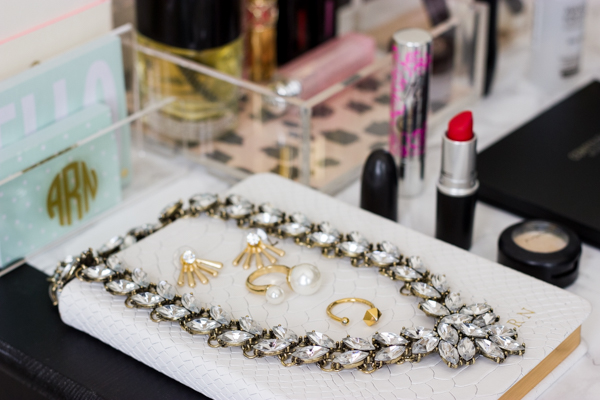
Gigi New York Daily Planner | Wanderlust Pearl XL Ring | Brandy Pham Ella Floating Ring | BaubleBar Crystal Studs | BaubleBar Statement Necklace
Step 4
Even on a night like NYE, I still like a neutral eye. I am using MAC Eyeshadow in Nylon and my Anastasia Contour Kit (the color Fawn) for the crease. I start by using Nylon over my entire eyelid, then sweeping down in the front corner of my eye. I use the Fawn shade from the contour kit for the crease. You could easily play this up and make it more dramatic, especially with the browns in the kit. I chose to keep it simple.
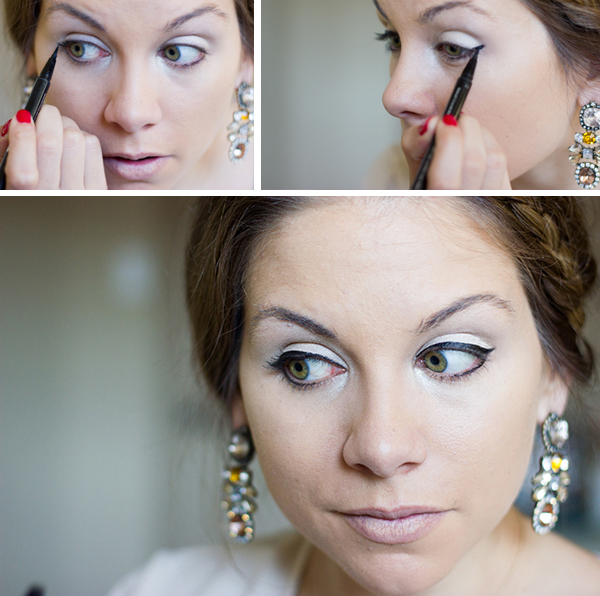
Next, I opted for winged eyeliner to give the simple look a little more glam. Now, don’t be fooled. Winged eyeliner is very hard (in my opinion) to get right. It is something that takes a lot of practice to get right. And for me, I am definitely still perfecting my technique.
I use Stila Liquid Eyeliner to get that “wing” look. It’s like a felt tip marker, so it has good control. Most people (and probably the correct way) draw the cat eye in one fluid stroke. But I’ve found an easier way. A good friend of mine is a makeup artist with MAC and she taught me a way to “fake” the winged look. Instead of trying to get the wing in a single fluid motion, you can break it up in two parts.
First, start by drawing the outside wing (refer to the top right picture below). Start on the outside corner of your eye and draw up to make a natural curve. You can always use a q-tip if you mess up—we’ve all been there! Finish, by drawing the rest of your eyeliner with your regular eye pencil or this liquid version.
Step 5
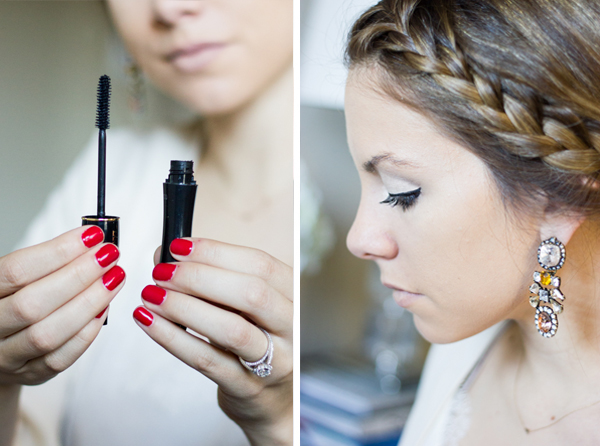
My favorite mascara of all-time has to be Lancome Hypnose. I’ve tried many others, but I always seem to come back to this one. I like that it gives good volume and it doesn’t flake off.

Step 6
To make your eyes really pop, add a waterproof eyeliner to the waterline of your eyes. I love this one from Makeup Forever in Mat Black. It goes on creamy and really lasts all day. Gently apply it only to the bottom inner edge of the eye. I know it looks like I am really pulling on my eye, but it doesn’t take much to draw on the liner.
Step 7
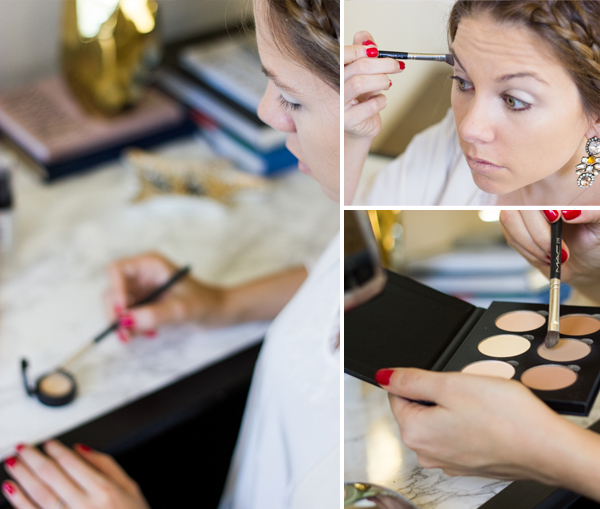
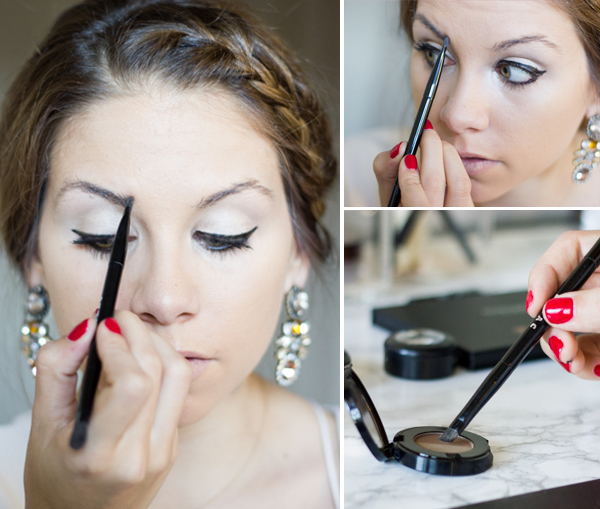
As you can probably tell from the previous pictures, brow powder is my best friend. Ha! But really… I hate to admit it, but I didn’t actually start using brow powder until a few months ago. It’s nothing too dramatic, but just fills in the brow for a fuller look. I find it easier to use a powder with a brow brush, than a pencil. It’s easier to control and if you mess up- it’s an easy fix. I use Anastasia Duo Brow Powder in Taupe. I start to fill in my brows by making upward strokes. I like to start at the inside corner and work my way over. This brush by Lorac is a also great tool to use for filling in your brows.
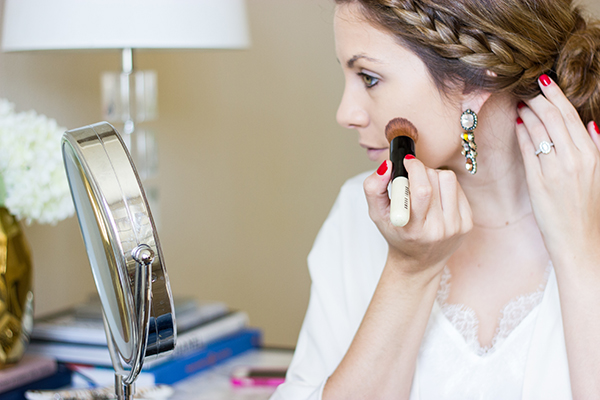
Step 8
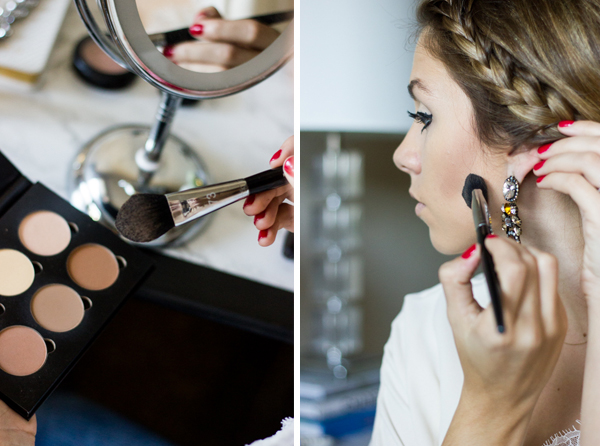
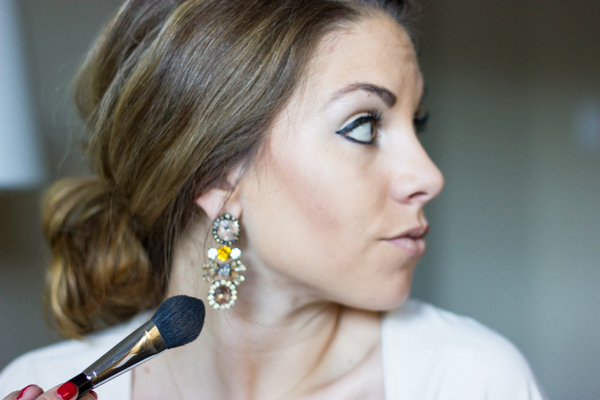
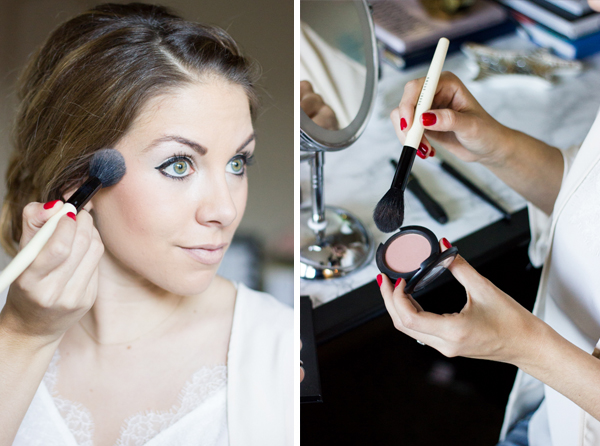
I like to use the Anastasia Contour & Highlight Kit to define my cheekbones. This kit is amazing because they are all matte and the colors are completely versatile. I used Fawn as the crease in my eyeshadow. I like this brush from Sephora. It’s cheap and I never have any issues with bristles falling out. I start by gently making a diagonal line from the top of my cheekbone to the hollow of my cheek. You don’t want to apply too much! This will create a nice shadow and give your face more definition. On my cheeks, I used MAC Blush in Tenderling. This is absolutely my favorite blush. The color is soft, but so easy to layer on for a deeper shade of pink. This is truly a universal shade for both summer and winter months. I used the Bobbi Brown Powder Brush to apply the blush. After the blush is applied, I used Banana, from the contour kit, on the top part of my cheek bones to give it a brighter, highlighted look.
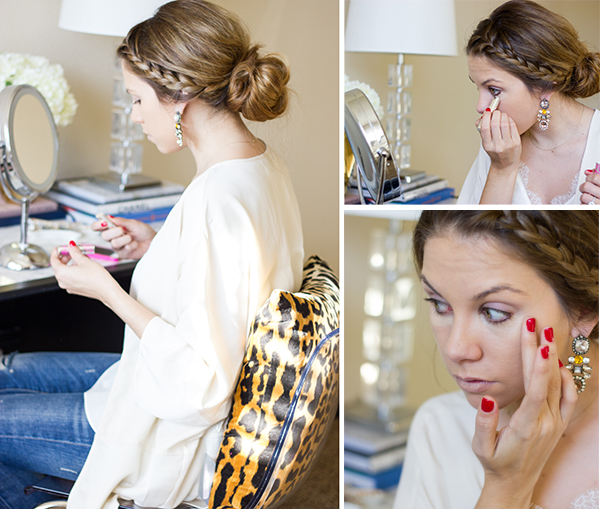
Step 9
I like to kick this up a notch with a bold lip. I’ve never been a fan of red, simply because I never could find the right shade for me. I met with my friend (the makeup artist at MAC) and she told me about the color Dangerous. Instantly, it became my go to for a red lip. It has an “orangey” tint to it, but don’t be scared. It’s the perfect red in my opinion! Side note: this lipstick also has some serious staying power. It has a matte finish, and will literally last all night (I have to scrub to get it off). Sounds perfect for NYE right?


Step 10
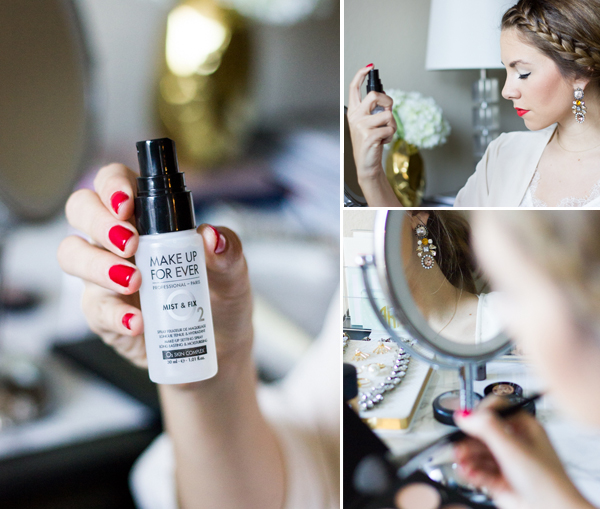
Set your look with Makeup Forever Mist & Fix. This little spray not only helps your makeup stay on, but it’s great for touch-ups too! To set your makeup, simply spray and go.
If you are wanting a touch up, spray and gently blot your face with a tissue. This might sound strange, but it actually works. No need to apply any more powder, this gives the look of a fresh face with just a coupe of sprays.
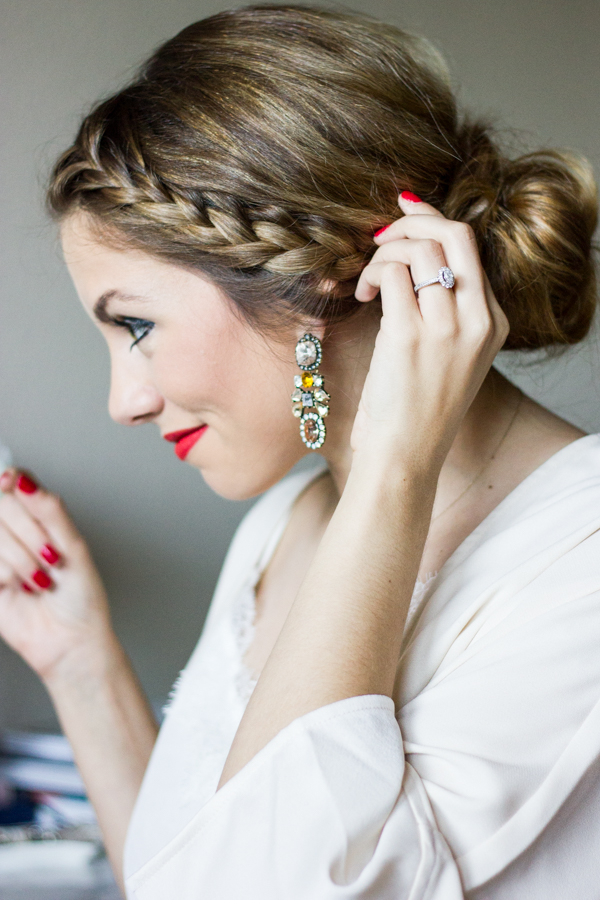
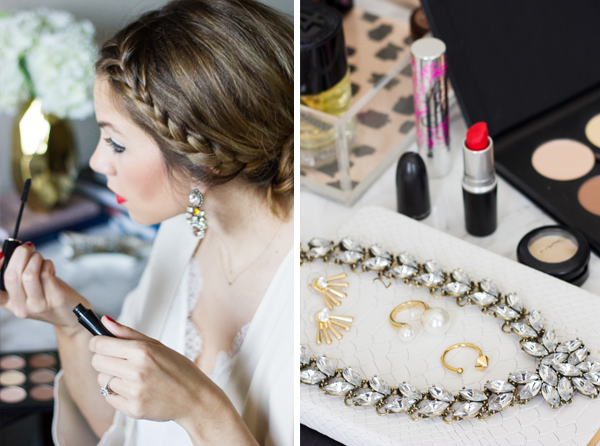
Wearing: Forever 21 Kimono | Cami NYC Racer Cami | Baublebar Statement Earrings | Nails- OPI “Color So Hot It Berns”
I love getting emails from you guys asking advice for hair and makeup and I really try my best to help answer all of those. However, between balancing a full time job and writing this blog, emails can get missed. Please feel free to comment or send me an email (theteacherdiva@gmail.com) if you have any questions or requests for future Beauty Talks. Thank you so much for all of your support! xo
| Click to Shop |


Love these tutorials– so fun and pretty!
This is such a great NYE look! I have not tried out the Lorac eyeshadow primer or that MAC lipstick in Dangerous, but may have to pick them both up after reading this post, that lip color is gorgeous! Hope you have a great New Years!
xoxo Nicole
http:www.brazenbrunette.com
This is such a great NYE look! I have not tried out the Lorac eyeshadow primer or that MAC lipstick in Dangerous, but may have to pick them both up after reading this post, that lip color is gorgeous! Hope you have a great New Years!
xoxo Nicole
http://www.brazenbrunette.com
I absolutely adored this beauty post. It was not only fun to read, but it was easy to follow. Thank you for taking the time to put this together. I am definitely going to try to replicate this look for NYE.
A Lovely Lifestyle
I swear by Nars Radient Creamy Concealer!! I have tried quite a few and this one is perfect bc it gives the perfect coverage, doesn’t crease and looks flawless all day! http://www.fancyherstyle.blogspot.com
Hi Andrea, Thank you for your comment. I have not tried that but I heard amazing things. It is next on my list to try! I appreciate the recommendation. Happy NY!
Such a gorgeous look! And so glad you like the concealer. After seeing how great it looks, I might have to pick some up for myself! 😛
Thank you, Megan! I think you would love the Benefit concealer! Let me know your thoughts if you try it. xx
Loving the matching red lips and nails! So gorgeous! Happy New Year!
Thank you so much! Happy New Year! xx
I love the Anastasia Contour Kit! I never thought of using the colours for eye shadow, but your right fawn or havana would be a perfect crease colour! Thanks for the tip! Love the blog!
http://trailofsprinkles.blogspot.ca
Thank you! I am glad you found it helpful. Happy New Year! xx
So pretty! I love these tutorials. I’d love to see how you did your hair next 🙂
I agree! I’d love to see a tutorial of this braid!!
Hi Marenda,
Thank you for your comment! My goal is to get more hair/makeup tutorials out this year. I will definitely include this one. (It was actually pretty easy!) Thank you so much for following! xx
I love this post, great ideas on how to use the contour kit- I just got it for christmas and have been playing around with it!
http://www.behindtheleopardglasses.com
Hi Emma,
Isn’t the kit amazing? I am still playing around with it, but I love it so far. Thanks for following! xx
I am a new follower and absolutely love this tutorial. It’s simple and to the point. I like how you broke it up into steps that make it easy to follow. Looking forward to what you share in 2015!
Thank you, Charlie for following!
Stunner
I love your tutorials. I know you don’t do a lot of them, but they really are helpful. Have you ever thought of doing video? I think you would be great at it! Love following your blog and instagram account. Happy New Year, Ashley!
New follower! Thanks for sharing!
Your humoristic style is darn out cool, keep up the good work! http://www.tessielashes.com
makeup https://youtu.be/iZPU6PAQ26c/
Where did you get your round, lighted mirror?